Essential Survival Skills for Staying Safe in the Wilderness
You have exactly three hours to find shelter in extreme weather before your body begins to shut down and hypothermia takes over. Understanding core Survival Skills isn't just about being...
Essential Survival Skills for Staying Safe in the Wilderness
You have exactly three hours to find shelter in extreme weather before your body begins to shut down and hypothermia takes over. Understanding core Survival Skills isn't just about being a hobbyist; it's about staying alive when a simple day hike turns into a multi-day emergency. Most people think they have days to figure things out, but the reality of the wild is much less forgiving than a backyard campout.
The stakes are higher than a missed dinner; dehydration sets in fast, requiring at least half a liter of water every hour when you're active. If you take a wrong turn at dusk and lose the trail, your safety is 90% mental and only 10% about the gear in your pack. One small mistake, like following a shortcut that doesn't exist, can leave you stranded without a way to signal for help or stay warm as temperatures drop below freezing.
While many guides just list generic gear, this article breaks down the psychological STOP method and the 5 Cs of survival gear used by professional search and rescue teams. We've pulled together data from wilderness medicine experts and long-term survival studies to explain not just what to do, but exactly how to do it when your modern tools fail. This isn't just a list of items; it's a prioritized survival strategy based on real-world rescue data.
You will walk away knowing how to build a debris hut that actually holds heat, how to purify water using nothing but sunlight, and which fire-starting tools will never let you down in a spring snowstorm.
Why Most Hikers Get Lost and How to Avoid It
Most hikers get lost because they rely too much on their gear and too little on their surroundings. Overconfidence leads people to ignore trail markers or assume they can sense the right direction without checking. According to JD Alewine from Southeast Wilderness Medicine, awareness is the first step in ensuring your safety. If you are not actively tracking your location every few minutes, you are essentially walking blind until a crisis occurs.
Navigation is about constant awareness, not just looking at a map when you are already confused. Many people treat their GPS like a magic wand, but by the time you feel the need to check it, you might have already drifted a mile off course. Understanding why this beginner wilderness survival guide makes survival skills simple helps you realize that your brain is your primary tool. Real survival happens when you synthesize environmental clues like the sun's position and the wind direction before things go wrong.
Imagine a hiker who sees the sun dipping low and decides to take a quick shortcut through a valley to save time. As the shadows lengthen, the familiar landmarks start to look different. The shortcut does not lead back to the trail, and suddenly, every ridge looks identical. This is where wood shock happens. It is a physiological panic response that makes you want to run, which only makes the situation worse by burning energy and moving you further from help.
A common mistake is assuming a phone or GPS is all the insurance you need. Batteries die in the cold, and electronics fail when dropped in water or losing a signal in deep canyons. Analog skills are your true backup. For instance, a signal mirror can be effective for daytime signaling up to 10 miles away, which is far more reliable than a phone with no bars. The catch is that tools only work if you have the presence of mind to use them correctly.
To fight the panic of being lost, you must use the STOP method: Sit, Think, Observe, and Plan. Staying put is almost always safer than wandering, as search teams look for stationary targets. If you have a whistle, use it to signal while you are still. If you lose your equipment, knowing survival skills like how to find water, navigate, and build shelter will keep you alive. Safety in the wild is serious, so consider taking a local survival course for hands-on experience.
Key insights:
Sit down and breathe the moment you feel unsure of your path to stop the panic response.
Blow three sharp blasts on a whistle every few minutes to signal rescuers from a stationary position.
Stay in one place once you realize you are lost to avoid moving away from search and rescue teams.
Check your map and surroundings every fifteen minutes even when you think you know where you are.
The STOP Method in Action
The STOP method (Sit, Think, Observe, Plan) is the primary protocol for defeating "wood shock," a dangerous physiological panic response that triggers an overwhelming urge to run when a hiker realizes they are lost. By sitting down the moment you feel unsure, you force your heart rate to drop and allow your brain to transition from emotional panic to logical problem-solving. This immediate pause is critical because staying stationary makes you a predictable target for search and rescue teams, whereas moving while panicked often leads people further into hazardous terrain.
What most hikers overlook is that survival is a psychological battle before it ever becomes a physical one. While beginners often focus on collecting gadgets, the expert consensus from Troop 333 San Francisco is that skills and mental clarity are far more valuable than the "stuff" in your pack. The pattern here is clear: the STOP method acts as a circuit breaker for the brain. It allows you to prioritize the Rule of Threes - focusing on immediate needs like shelter or signaling - rather than wasting precious calories and water while wandering aimlessly.
Imagine you are hiking and realize the trail markers have vanished as the sun dips below the horizon. Instead of sprinting toward what you hope is the path, you sit on a fallen log and take a drink of water. You observe your surroundings, realize you have a whistle, and begin blowing three sharp blasts - the universal distress signal. Because you stayed put, you avoid the common trap of walking into a deep drainage or canyon where your signal would be muffled and rescue becomes significantly harder.
The catch is that many people wait too long to admit they are actually lost, often falling for the "just over the next ridge" fallacy. This ego-driven mistake leads to exhaustion and dehydration, which further clouds judgment. One thing most guides emphasize is that the STOP method is effective even if you are only slightly confused; it is better to pause early than to realize you are miles off-course later. Since wilderness conditions and personal health needs vary, it is always wise to consult with a professional guide or wilderness instructor for training tailored to your specific environment.
Before you take another step, remember that your goal is to be found, not to find your own way out through guesswork. Use the tools you have, like a signal mirror which can be seen up to 10 miles away during the day, to let rescuers come to you.
Key insights:
Sit down the second you feel confused to kill the adrenaline-fueled urge to run.
Think logically about your last known location and your current resources before moving.
Observe your immediate area for landmarks or materials to build a ground-to-air signal.
Plan to stay stationary and use three sharp whistle blasts to alert search teams.
Avoid the temptation to keep walking just to see what is over the next hill.
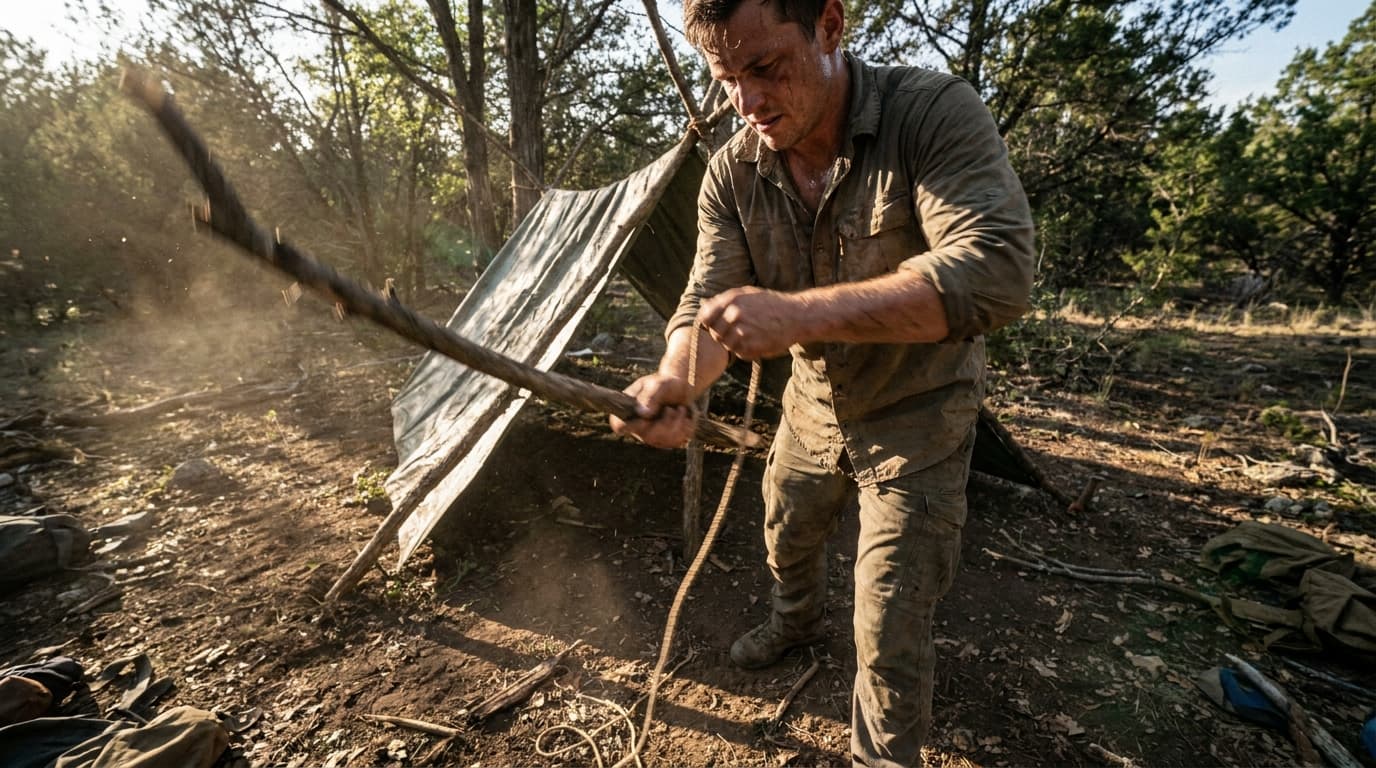
Building an Emergency Survival Shelter Fast
In a survival situation, the clock starts ticking the moment you realize you are in trouble. According to the Rule of Threes, you only have about three hours to secure shelter in harsh conditions before exposure becomes a life-threatening issue. When you do not have a tent, your goal is not to build a permanent home. Instead, you need to create a small, insulated cocoon that traps your body heat and keeps you dry. This means prioritizing a thick layer of insulation between you and the cold ground while building a tight outer shell to block wind and rain.
Most people think of a shelter as just a roof, but in the woods, the ground is your biggest enemy. The cold earth will pull the heat right out of your body through a process called conduction. What this actually means is that a survival shelter is more of a bedding system than a building project. By combining the 5 Cs of survival, specifically cover and cordage, with natural materials, you turn the environment into a thermal barrier. As the experts at Troop 333 San Francisco often say, skills are more important than stuff. The consistent pattern in successful survival stories is not the complexity of the structure, but the thickness of the insulation used to stay warm.
Imagine you are hiking and a sudden afternoon thunderstorm turns into a freezing evening drizzle. Your clothes are damp and the temperature is dropping toward forty degrees. Instead of wandering for hours looking for a cave, you find a fallen log or a sturdy low branch. You spend forty minutes piling up a massive mound of dry leaves and pine needles to sleep on. You then lean branches against the log and cover them with more debris until the structure is just big enough for you to crawl inside. This debris hut mimics the way a squirrel or bear stays warm by using trapped air pockets to keep you alive through a rough night.
One thing most guides get wrong here is encouraging people to build roomy shelters. A large, beautiful shelter is often a mistake in cold weather because there is too much air for your body to heat up. The catch is that your shelter should be so small that you can barely turn around in it. It might feel a bit tight, but that small space is what keeps the warmth from escaping. Also, many beginners waste hours on the roof while ignoring the floor. If you do not have a proper fire starting kit to provide external heat, your leaf bed is the only thing standing between you and hypothermia.
Individual circumstances vary, and it is always worth checking with a local wilderness instructor for advice specific to your regional environment and weather patterns. If you find yourself in a situation where you are wet and cold, your priority must be stopping the heat loss immediately rather than searching for the perfect campsite. You can learn more about these basics in our beginner wilderness survival guide to help prepare for your next trip.
Key insights:
Gather enough dry leaves, grass, or pine boughs to create a compressed cushion at least six to eight inches thick before building any walls.
Build the frame small and low to the ground to minimize the volume of air your body needs to warm up during the night.
Layer debris like a shingle roof, starting from the bottom and working up, so water sheds off the sides rather than leaking through the top.
Use the STOP method to assess your surroundings for natural windbreaks, like large boulders or thickets, before you start gathering materials.
How to Purify Water Without a Filter
To safely purify water without a specialized filter, your most reliable method is heat. Bringing water to a rolling boil for at least one minute is the gold standard, as it kills the vast majority of pathogens, including bacteria, viruses, and protozoa like Giardia. If you are high in the mountains, you should extend this boiling time to three minutes to account for the lower boiling point of water at high altitudes. If fire is not an option, you can use Solar Disinfection, or SODIS, by placing clear plastic bottles in direct sunlight for at least six hours. These methods rely on thermal energy or UV radiation to break down the DNA of microorganisms, making the water safe for human consumption.
What this actually means is that you should treat every natural water source as a gamble you are likely to lose. Many hikers assume clear, running water is safe, but pathogens thrive in backcountry streams regardless of how pristine they look. The Rule of Threes reminds us that you can only survive about three days without water, making procurement a top priority. However, drinking raw water is a massive risk. Most people overlook the fact that Giardia can survive in cold, fast-moving water for weeks. In practice, purification is a metabolic necessity because you need at least half a liter of water every hour while active to prevent your cognitive functions from sliding into the haze of dehydration.
Imagine you have just crossed a waist-deep river and a sudden current sweeps your pack away, taking your pump filter and purification tablets with it. You are miles from the trailhead, the sun is beating down, and the only water source nearby is a stagnant pool filled with algae and mosquito larvae. Without your gear, you have to rely on what you can find or salvage. If you still have a metal water bottle or can find a discarded tin can, your first move is to build a fire. Even that murky pool water becomes a lifeline once it has been boiled, providing the hydration you need to survive while you plan your next move using the STOP method to stay calm and focused.
One thing most guides get wrong here is overestimating the effectiveness of natural filters like sand and charcoal. While pouring water through layers of grass, sand, and charcoal can remove large debris and improve the taste, it does almost nothing to remove microscopic pathogens. This works differently when you understand that mechanical filtration is not the same as biological purification. The catch with SODIS is also significant; it requires perfectly clear plastic bottles and a full six hours of high-UV sunlight. If the sky is cloudy or your bottle is tinted, the UV rays will not penetrate deeply enough to kill the bacteria. This is why boiling remains the only foolproof method when you lack modern survival gear.
Individual circumstances vary, and it is always worth checking with a wilderness survival instructor for advice specific to your regional environment. If you are forced to choose between life-threatening dehydration and drinking questionable water, the immediate risk of dying from thirst often outweighs the delayed risk of a stomach illness. You can find more details on handling these high-stakes moments in our guide on how to survive dehydration in the wild, which covers the balance between procurement and purification.
Key insights:
Boil water for a full minute at low elevations and three minutes in the mountains to ensure all pathogens are destroyed.
Use clear PET plastic bottles for solar disinfection and ensure they lay flat in direct sun for at least six hours on a reflective surface.
Avoid drinking saltwater or urine, as the high salt and mineral content will actually dehydrate your body faster than drinking nothing.
Look for a metal container in your gear or scavenged trash to use as a boiling vessel if you lose your primary water bottle.
Filter out large sediment using a cloth or layers of sand before boiling to improve the clarity and taste of the final product.
The Best Fire Starting Tools for Every Wilderness Trip
For a reliable wilderness fire kit, you should carry three distinct ignition sources: a ferrocerium (ferro) rod, stormproof matches, and a butane lighter. While a lighter is the most convenient tool, it is prone to mechanical failure or fuel evaporation in harsh conditions. A ferro rod is the gold standard for survival because it works even when soaking wet and can last for thousands of strikes. Stormproof matches act as your heavy-duty backup, providing a wind-resistant flame that burns long enough to ignite damp kindling when a simple spark is not enough.
Combustion is one of the '5 Cs of Survival,' and its value extends far beyond simply cooking a meal or staying warm. In a survival situation, fire is your primary tool for water purification; boiling water for at least one minute is the most effective way to kill pathogens. Beyond the physical, fire is a psychological anchor that boosts morale and prevents panic, which is the core of the STOP method (Sit, Think, Observe, Plan). It also serves as a vital signaling tool, producing smoke during the day and light at night to help rescuers locate you from miles away.
What most people overlook is that fire starting is a skill-dependent process, not just a gear-dependent one. As the experts at Troop 333 San Francisco point out, 'skills are more important than stuff.' You can have an expensive survival fire starting kit, but if you cannot identify natural tinder or build a proper 'bird's nest,' your tools are useless. The goal is to move from 'trying to make fire' to knowing fire will happen by understanding how to transition a tiny spark into a sustainable flame using progressively larger fuel sources.
Imagine you are caught in a sudden spring snowstorm. Your hands are numb, your fingers feel like wooden blocks, and your fine motor skills are fading fast. This is where a simple lighter often fails because you cannot flick the small wheel with frozen thumbs. In this high-stress moment, having a ferro rod you can scrape with a heavy, fixed-blade knife allows you to use gross motor movements to shower sparks into a pre-prepared pile of dry tinder. This isn't just about heat; it is about the massive morale boost of seeing that first flame when everything else in the woods is freezing.
A common misconception is that a standard pocket lighter is all you need for every trip. However, butane lighters struggle at high altitudes and can stop working entirely in extreme cold because the fuel fails to vaporize. This is why a spark-based backup is non-negotiable for anyone heading into the backcountry. Also, remember the 'Rule of Threes' - you might only have three hours to find warmth in a storm before hypothermia sets in. For more winter-specific advice, you can read about why the best survival gear for cold weather camping focuses so heavily on heat retention. Individual circumstances vary, so it is always worth checking with a wilderness instructor for advice specific to your regional environment.
Building a fire kit is about redundancy and preparation. By carrying multiple ignition sources and pre-made tinder, you ensure that you can create heat even when the environment is working against you.
Key insights:
Pack three distinct ignition sources: a lighter, stormproof matches, and a ferrocerium rod to ensure redundancy.
Include a dedicated dry tinder source, like cotton balls soaked in petroleum jelly, kept inside a waterproof container.
Practice using your ferro rod with gloves on to simulate the loss of fine motor skills that occurs during hypothermia.
Keep your fire kit in a pocket on your person rather than in your backpack in case you are separated from your gear during a river crossing or fall.
Look for 'fatwood' or birch bark in the wild as natural accelerants that burn even when the surrounding wood is damp.
Signaling for Help When You Are Off the Grid
When you are lost and off the grid, your primary goal is to become an anomaly in the landscape. To get rescued, you need to use tools like signal mirrors and ground-to-air symbols that break the natural patterns of the wilderness. A signal mirror is one of the most powerful tools in your kit because it can catch a pilot's eye from up to 10 miles away in standard daylight, and potentially up to 20 miles depending on atmospheric conditions. While you might feel small against a mountain range, a well-aimed flash of light is nearly impossible for a rescue crew to ignore.
Beyond light, you must create physical markers on the ground that signal distress. According to research from Troop 333 San Francisco, these symbols need to be massive - between 13 and 20 feet tall - to be clearly legible from an aircraft flying at several thousand feet. You do not need to spell out entire words; the international standard uses simple letters like 'V' for assistance or 'X' for medical help. These shapes are recognized globally by search and rescue teams and provide immediate information about your status without requiring a radio.
What most people miss about signaling is that contrast is far more important than raw size. A giant pile of dark logs on dark dirt is invisible from the air. You want to create a visual shout by using colors and textures that do not belong in that environment. This is why many survivalists are moving toward outdoor hacks and tricks like using space blankets or bright orange tarps as the base for their signals. If you are in a snowy area, use dark branches; if you are in a forest, use bright sand or rocks.
This focus on visibility ties directly back into the psychological state of survival. Skills are more important than stuff, but having the right signaling tools provides a massive morale boost. When you know you have the means to reach out to the world, you are less likely to succumb to the panic that often leads to fatal mistakes. Signaling isn't just a physical act; it's a way to maintain your awareness and stay focused on a plan while waiting for help to arrive. Individual circumstances vary, so it is always a good idea to take a certified wilderness survival course for hands-on training specific to your region.
Imagine you have been stationary for two days after a bad fall. You hear the distant hum of a bush plane, but it is just a tiny dot on the horizon, maybe 10 miles out. You pull out your signal mirror, sight the plane through the center hole, and begin a steady flashing motion. To the pilot, that tiny glass square produces a beam of light as bright as a lighthouse. Even if they are not looking directly at you, the rhythmic flash catches the corner of their eye, prompting them to bank the plane and circle back to investigate the source of the glare.
A common misconception is that you should always stay on the move to find help. In reality, once you realize you are lost, becoming a big, bright target in one spot is usually safer. Another nuance is the use of sound. While mirrors are great for planes, a whistle is your best friend for ground teams. Your voice will give out in hours, but a whistle can be heard much further and requires very little energy. Just remember that signaling is a 24-hour job; while mirrors work by day, you will need to rely on the Rule of Threes for fire-based signaling at night, ensuring you have enough fuel to keep three fires burning in a triangle to signal distress.
Key insights:
Construct ground symbols like V or X to be at least 15 feet long using high-contrast materials like logs, rocks, or bright clothing.
Keep a signal whistle around your neck at all times so it is accessible even if you are separated from your pack.
Practice aiming your signal mirror before an emergency by sighting the sun's reflection onto a nearby tree or rock.
Use the Rule of Threes for signals: three whistles, three flashes of light, or three fires in a triangle to signify an emergency.
Carry a small, lightweight signal mirror in your pocket as part of your 5 Cs gear kit for immediate access.
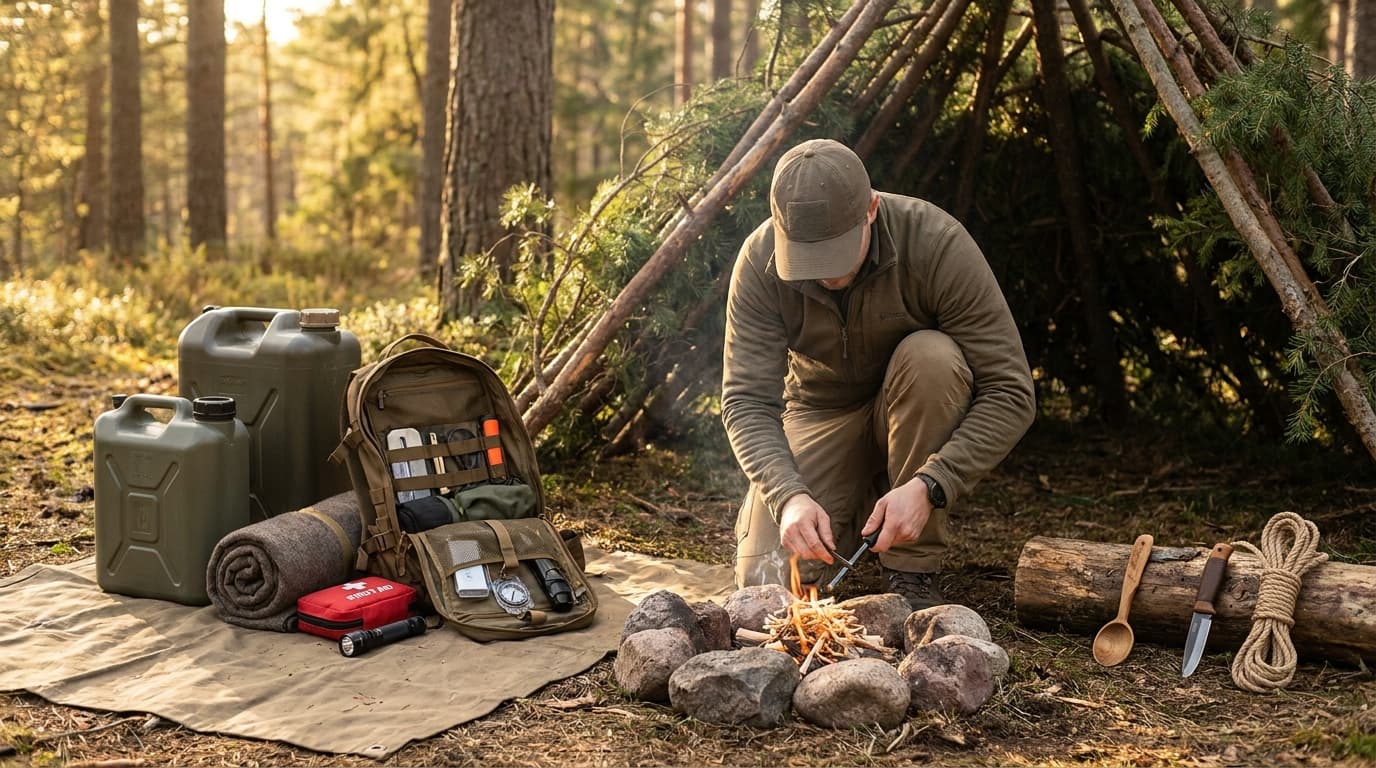
The Beginner Wilderness Survival Gear Checklist
The 5 Cs of survival - Cutting, Combustion, Cover, Containers, and Cordage - form the backbone of any reliable beginner kit because they represent the items most difficult to reproduce in the wild using only your hands. While you can eventually learn to weave a basket or friction-fire a coal, having a high-quality knife and a ferrocerium rod dramatically increases your odds of staying warm and hydrated during those first critical hours. As the experts at Troop 333 San Francisco often remind new hikers, skills are always more important than stuff, but the right tools act as a massive force multiplier when you are tired or injured.
What many beginners overlook is how modern gear has evolved to become multi-functional, a trend best seen in the rise of Survivorcord. This isn't just your standard 550 paracord; it is an integrated survival system that includes internal strands of waterproof fire tinder, fishing line, and even brass snare wire. By carrying this instead of basic rope, you are essentially packing four tools in the space of one. This shift toward multi-purpose gear is essential because it lightens your load while expanding your options for food procurement and fire starting, especially when you are following a survival fire starting kit for beginners.
Imagine you are caught in a sudden spring snowstorm and need to split damp logs to reach the dry heartwood inside. If you only have a standard folding pocket knife, trying to hammer it through the wood - a process called batoning - will likely snap the locking mechanism or the hinge, leaving you with a broken tool and no fire. This is why many experienced guides now recommend a sturdy fixed-blade knife, like a Morakniv, for beginners. It is simple, nearly indestructible, and allows you to process fuel for a fire that could save your life when your fingers are too numb to handle delicate tasks.
The most common gear mistake isn't buying the wrong brand; it is the pack-only mentality. There is a huge difference between gear you own and gear you actually have on your person when an emergency starts. If you slip and fall down a ravine, losing your main backpack in the process, the survival kit inside it is now worthless. True preparedness means having your most essential items attached to your body. As JD Alewine from Southeast Wilderness Medicine suggests, awareness of your situation is the first step, but having your 5 Cs in a pouch on your belt ensures that awareness can be turned into action even if you are separated from your main pack.
To make this practical, you should build what survivalists call a possibles pouch. This is a small, weather-resistant bag that lives on your belt or in your cargo pocket, never in your backpack. It should contain a small knife, a fire starter, a space blanket for cover, a way to treat water, and some cordage. By keeping these basics physically attached to you, you ensure that the beginner wilderness survival guide you read actually works in the field. Always remember that wilderness conditions change fast, so it is wise to consult with a local guide for safety advice specific to your region.
Key insights:
Choose a fixed-blade knife over a folding knife to handle heavy-duty tasks like splitting wood without the risk of the tool breaking.
Switch to Survivorcord for your kit to gain built-in fishing line and fire tinder without adding any extra weight or bulk.
Keep your survival essentials in a possibles pouch on your belt so you aren't left helpless if you lose your backpack.
Prioritize a metal container over plastic so you can boil water to kill pathogens, which is the most reliable way to make water safe.
Frequently Asked Questions
The biggest mistake most hikers make isn't actually about their gear; it is a lack of composure. When someone realizes they are lost, the natural instinct is to panic and start moving faster to find the trail, which usually just leads to getting further lost or exhausted. Instead, you should use the STOP method: Sit, Think, Observe, and Plan. Staying calm is vital because your psychological state is just as important as any tool in your pack. According to the Rule of Threes, you can survive for only about three hours without shelter in harsh conditions, so stopping to prioritize your needs is much safer than wandering aimlessly.
Here is the thing most people miss: your brain is your best survival tool. Skills and knowledge are consistently rated as more valuable than the actual stuff you carry. While having the right gear helps, knowing how to use it matters more. For instance, if you are stuck, you should focus on making ground-to-air signals that are between 13 to 20 feet tall so they are visible to rescue aircraft. If you are heading into the woods, it is always a good idea to chat with a professional survival instructor or local ranger to get some hands-on training for your specific environment before you head out.
Finding water involves looking at the landscape to see where it naturally collects. You should head toward low-lying areas, valleys, or spots with very green, lush vegetation. You can also follow animal tracks or listen for the sound of running water. However, finding it is only the first step because natural sources are almost never safe to drink as they are. You need to drink at least 1/2 liter of water per hour while you are active to keep your body and mind functioning correctly. Dehydration happens faster than you think, and it makes it very hard to make good decisions in an emergency.
Since untreated water can make you very sick, you have to purify it. The most reliable way is to boil the water for at least one minute to kill pathogens. If you can't make a fire, you can use Solar Disinfection (SODIS) by putting water in clear plastic bottles and leaving them in direct sunlight for six hours. Just keep in mind that every situation is unique, so checking with a local wilderness expert or ranger about water safety in the area you are visiting is the best way to stay safe. Also, never drink saltwater if you are near the ocean, because it will actually dehydrate your body faster than drinking nothing at all.
Yes, you can absolutely start a fire with two sticks, but it is much harder than it looks on TV and takes a lot of practice. The most common way to do this is called the bow drill method, where you use friction from a wooden spindle and a fireboard to create a glowing coal. While it sounds simple, your choice of wood and your technique have to be just right. According to Southeast Wilderness Medicine, these friction fire skills are essential even if you carry modern tools.
Here is the thing most people miss: it is much easier to carry a small backup tool than to rely on sticks alone. In the survival world, we talk about the 5 Cs of gear, where combustion is a top priority. Keeping a ferrocerium rod or a lighter in your kit makes a huge difference. If you are just starting out, remember that skills are more important than stuff, but having a few tools will greatly help your chances. It is a good idea to take a class from a local survival expert to learn these skills safely, as fire can be dangerous if it is not handled correctly.
The very first thing you should do if you realize you are lost is stop moving and use the STOP method. This stands for Sit, Think, Observe, and Plan. It sounds simple, but your psychological state is just as important as your physical tools when things go wrong. Taking a moment to sit down helps you calm down so you can think logically about your situation instead of panicking. Once you are calm, you can look at your surroundings for landmarks or resources.
You also need to think about your immediate needs based on the Rule of Threes, which reminds us that you can only survive about three hours without shelter in extreme conditions. Your next move might be building a quick shelter or setting up a signal. For example, you can make ground-to-air signals out of logs or rocks that are between 13 and 20 feet tall so rescue planes can see them. Of course, checking in with a local park ranger or a professional guide before your trip is the best way to stay safe, as they can give you specific advice for the area you are visiting.
Conclusion
Survival is less about the shiny brand of your knife and more about the quality of your decisions when the woods get quiet. When you look at the 5 Cs or the steps for cleaning water, the common thread is simple: preparation beats panic every time. Most people get into a mess because they wait for an actual emergency to start thinking like a survivor. But as we have seen, staying safe comes down to the STOP method. It is the bridge between having a bag full of gear and actually staying alive. If you can keep your head and stay put, you have already won the hardest part of the battle. The best approach is to treat every weekend hike as a low-stakes practice session for your survival skills rather than just a walk in the park.
Looking ahead, the line between high-tech gadgets and old-school survival is getting thinner. We have satellite messengers now that can call for help from almost anywhere, but they cannot keep you warm when you are shivering or find dry wood for you in the rain. The real lesson that most people miss is that tech is just a backup for your brain. Even as gear gets lighter and fancier, the physics of a warm leaf bed and the chemistry of a good spark remain exactly the same. Relying only on a battery is a gamble that experienced hikers just do not take. The future of staying safe is a mix of using your GPS while keeping your primitive skills sharp enough to work when the screen goes dark.
Your next step should be hands-on and a little bit of fun. Instead of just reading about these ideas, take a small kit on your next local trail and try to start a fire with a spark or pick out the perfect spot for a debris hut. Doing this when you are safe and warm builds the muscle memory you will need if things ever get dicey. Survival is not a hobby you start when you are already lost; it is a way of seeing the world with your eyes wide open. Pack the right gear, but carry the real power in your head.
Every WilderReady guide is researched, written, and fact-checked in-house against trusted references such as the American Red Cross, the National Park Service, and the CDC before it goes live. We publish under this shared byline instead of invented personas, so you always know who stands behind the guidance you are reading.