How to Build a Wilderness Shelter That Actually Keeps You Warm
Imagine the sun dipping below the trees and the air turning sharp and cold. Most people worry about food or water first, but your body heat is actually your most...
Rowan Hale
Bushcraft Instructor & Backcountry Skills Writer

How to Build a Wilderness Shelter That Actually Keeps You Warm
Imagine the sun dipping below the trees and the air turning sharp and cold. Most people worry about food or water first, but your body heat is actually your most urgent resource in the woods. Developing your survival skills by knowing how to build a survival shelter is the best way to stay safe. Think of it like building a giant, cozy outdoor cat tree, but one designed to keep you alive and warm.
The environment is surprisingly good at stealing your warmth through the cold ground and biting wind. We'll show you how to create an emergency debris hut that works like a natural sleeping bag. You'll discover natural insulation tips and why your wilderness bedding is actually more important than the roof over your head. It's all about using sticks and leaves to trap every bit of heat you've got.
We're covering everything from bushcraft shelter design to the four-inch rule for keeping your bed dry. You'll learn how to pick the perfect spot and build a structure that keeps you bone-dry even if it pours. Let's get into how you can turn a pile of forest debris into a toasty home for the night.
Why Your Shelter is Your Best Friend in the Woods
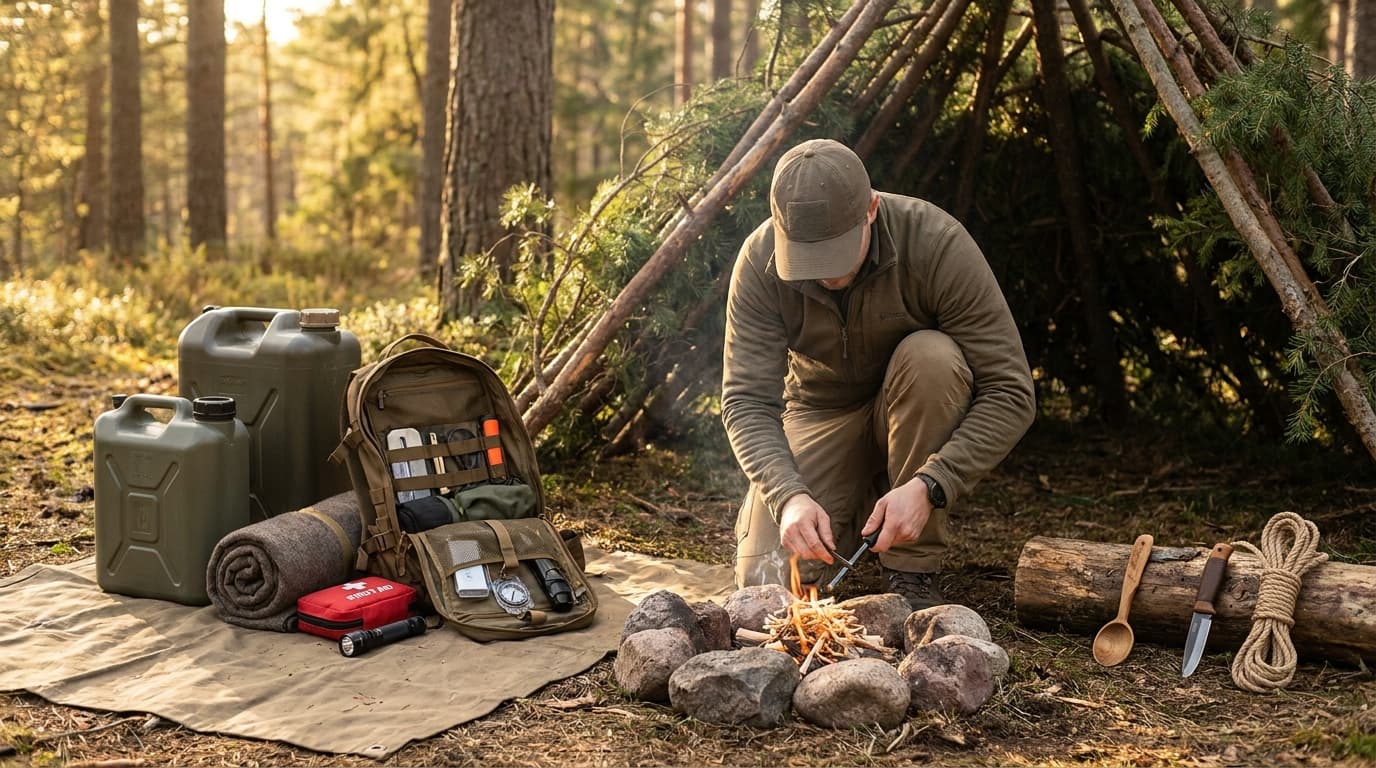
Imagine the sun dipping below the trees and the temperature starting to bite. That crisp air feels nice at first, but it can turn dangerous fast. Your shelter isn't just a pile of sticks; it is your life support system. Most people make the mistake of building a huge fort, but a small, snug space holds your body heat much better than a drafty mansion. Before you start grabbing branches, remember to STOP: Stop, Think, Observe, and Plan. This simple method keeps you from making panicked choices that waste precious energy when you need it most.
The Battle Against the Elements. Staying warm is a constant fight against convection, conduction, and radiation. Think of conduction as the ground literally sucking the heat out of your bones, which is why a thick bed of leaves is non-negotiable. Convection is the wind stealing warmth from your skin, and radiation is your body heat escaping into the open air. When the sun goes down, the wind becomes your biggest enemy. It cuts through damp clothes and drops your core temperature before you even realize it. A good shelter acts like a thermos, trapping a thin layer of warm air around you so you aren't trying to heat up the entire forest.
Thinking Like a Wild Creature. Have you ever noticed where animals sleep? They don't pick the middle of a flat field. They find natural dips, thickets, or the space under low-hanging evergreen boughs to block the wind. You should do the same. Look for a spot that is slightly elevated so you don't wake up in a puddle if it rains. Water flows downhill, and cold air settles in low spots too. Find a micro-climate, which is just a fancy way of saying a nook that feels a few degrees warmer than the woods around it. By mimicking how animals tuck themselves away, you stay much drier and save your energy for the morning.
What does this mean for you? It means your first priority isn't comfort, it's insulation. If you can keep the wind off your back and the cold ground away from your skin, you've already won half the battle. Building a survival shelter is about working with the landscape rather than trying to fight against it.
Key insights:
- Small shelters are easier to heat with your own body warmth than large ones.
- The ground will steal more heat than the air, so prioritize a thick floor.
- Always check for overhead hazards like dead branches before setting up camp.
- Use the STOP method to avoid burning through your energy reserves too quickly.
The Battle Against the Elements
Staying warm is a fight against physics. You lose heat through conduction on the cold ground, radiation into the air, and convection when the wind strips it away. Think of your body as a battery that is slowly draining. You have to plug those leaks to survive the night.
Wind is your biggest enemy once the sun drops. You can build a thick roof, but if air whistles through the walls, you are in trouble. Moving air acts like a sponge for your heat. A good shelter must be windproof because a light gust drops your temperature faster than still air ever could.
To stay safe, block the breeze and insulate the floor. If you ignore the ground, conduction will suck the heat right out of you. Use thick layers of dry debris to create a barrier. It is about understanding how the elements work.
Key insights:
- Wind chill often kills faster than the ambient temperature.
- Ground insulation prevents conduction from draining your core warmth.
- A windproof barrier is the most critical part of any bushcraft shelter design.
Thinking Like a Wild Creature
Think about how a cat always finds the warmest spot behind the sofa. They are experts at reading the landscape. When you are learning how to build a survival shelter, you have to think just like them. A solid bushcraft shelter design is not just about sticks. It is about finding that perfect location. You want a nook that blocks the wind and uses the earth to trap heat.
But here is the thing. Don't just settle for the first flat spot you see. If it rains, that cozy nook could turn into a giant puddle. Nobody likes a soggy emergency debris hut. Look for high ground and avoid dead branches overhead. By picking a dry, tucked-away spot, your wilderness bedding and natural insulation tips will actually do their job. This keeps you as toasty as a kitten in a basket.
Key insights:
- Animals prioritize wind protection and dry ground above all else.
- Avoid the bottom of slopes where water naturally collects during rain.
Building the Perfect Debris Hut Without Any Tools
Think of the debris hut as nature’s version of a heavy-duty sleeping bag. When you are out in the woods without gear, this is your best bet for staying alive through a cold night. It is the gold standard for solo survival because it is designed to trap your body heat in a very small, heavily insulated space. You do not need a saw, a knife, or any paracord to make this work. You just need what the forest floor provides and a bit of patience before the sun goes down.
Your first job is picking the right spot, and this is where most people mess up. Before you start gathering wood, look up. You need to avoid widow-makers. These are the dead branches hanging in the trees that could fall if the wind picks up. Also, stay away from low-lying areas where dampness and cold air settle like a puddle. If you can find a sturdy fallen log or a large rock to lean your ridge pole against, use it. It saves you the effort of building a support from scratch and gives you one solid wall for free.
Next comes the skeleton of the shelter, which starts with the ridge pole. This is a long, thick branch that serves as the spine of your hut. It needs to be sturdy enough to hold the weight of several inches of leaves and sticks without snapping on you while you sleep. Prop one end up on a stump or a low tree fork. The big secret here is the height. You only want enough room to crawl inside and lie down. If the ceiling is too high, you will waste all your energy trying to warm up the empty air around you.
Once the ridge pole is set, you will lean smaller ribs against it to create a basic A-frame shape. These ribs should not be massive logs. They just need to create a cage that can hold your insulation. Think of it like building a ribcage for a giant. As you place these branches, keep them close together so the leaves you pile on later do not just fall through the gaps. It takes some time to gather enough materials, but once that skeleton is solid, you are halfway to staying dry and warm.
Key insights:
- Always check for overhead hazards like dead branches before setting up.
- Natural features like logs or rocks can save you hours of construction time.
- Keep the interior space as small as possible to maximize your body heat.
- The ridge pole must be strong enough to support heavy layers of debris.
Finding the Right Spot (Location is Everything)
Before you even touch a branch, look up. You need to make sure there aren't any "widow-makers" hanging above your head. These are dead, heavy limbs that could fall during the night and end your trip. Also, try to stay away from the bottom of valleys or low-lying damp areas. Cold air and moisture settle there like a heavy blanket, making it much harder to stay dry and warm.
Here's the thing: you want to let nature do the heavy lifting. Using a sturdy, fallen log as a main support can save you hours of gathering wood. It serves as a ready-made spine for your debris hut, allowing you to focus on insulation instead of wrestling with heavy branches. Just make sure the log is solid and not home to a massive colony of ants.
If you choose the right location from the start, your shelter is already halfway done. Why work harder than you have to when the forest provides the perfect foundation? It is all about working with the land rather than against it.
Key insights:
- Check for overhead hazards like dead branches before setting up camp.
- Avoid low spots where dampness and cold air naturally collect.
- Utilize existing natural structures like fallen logs to save energy.
The Skeleton: Setting Up Your Ridge Pole
Think of your ridge pole as the backbone of your entire home for the night. If this one piece of wood fails, the whole thing comes crashing down on you while you sleep. You want a thick, sturdy branch that is roughly one and a half times your height. Look for downed wood that is dry and solid rather than something soft or spongy. If you can jump on it and it does not snap, you have probably found a winner.
Here is where most people get it wrong. They want a big, roomy tent, but in a survival situation, space is actually your enemy. You want the ridge pole set just high enough so you can barely crawl inside on your hands and knees. Why so low? Because your body is the only heater you have. A smaller space means your body heat stays trapped near your skin instead of drifting off into the empty corners of a tall ceiling.
Once you prop one end of that pole against a tree or a sturdy stump, take a second to look at it. It might feel a bit cramped, but that is exactly what will keep you alive when the temperature drops. A low, tight frame is the secret to a warm night. It might not be pretty, but it works when it counts.
Key insights:
- Test your ridge pole by putting your weight on it before building.
- Keep the ceiling low to trap your body heat effectively.
- Avoid using rotten or punky wood that absorbs moisture and breaks easily.
The Secret to Staying Warm: Better Wilderness Bedding
You can build the sturdiest roof in the woods, but if you are lying on the bare dirt, you are going to freeze. Most people think a shelter is just about blocking the wind or rain. But the real battle for warmth happens right underneath your back. Think of your bed as the foundation of your survival. If it is thin or damp, you are basically sleeping on a giant ice pack that never melts. It is the one mistake that ruins an otherwise perfect night.
Why is the dirt so cold? It comes down to basic conduction. When two objects touch, heat moves from the warmer one to the colder one. Since your body is around 98 degrees and the earth is usually much colder, the ground will literally suck the heat right out of you. You could have a fire going, but if there is no barrier between your skin and the soil, you will stay shivering. Staying warm is mostly about keeping that separation. You need to create a thick layer of insulation so the ground cannot steal your energy.
Finding the right materials is your next step. You want to look for the soft, dry stuff like pine needles, dry leaves, and ferns. These materials are great because they trap tiny pockets of air, which is exactly what keeps you warm. You want to gather as much as you can and pile it high inside your shelter. Think of it like building a natural mattress from the forest floor. The drier the material, the better it will perform.
But here is the most important part. You have to compress it. This brings us to the four-inch rule. A loose pile of leaves feels fluffy at first, but it will flatten out the second you lay down. You need at least four inches of compressed material between you and the earth to stay warm. That means your starting pile should probably be about a foot high before you climb in. If you can still feel the hard ground through your bedding, you need more layers. It might seem like a lot of work, but that extra padding is what makes the difference between a long night of shivering and a good night of sleep.
Key insights:
- The ground acts as a heat sink, drawing warmth away from your body through direct contact.
- Dry natural materials like pine needles and leaves provide the best insulation by trapping air.
- The four-inch rule ensures you have enough compressed material to stay separated from the cold earth.
Why the Ground Steals Your Heat
Ever wonder why you still feel freezing even inside a sturdy shelter? It is usually because of the ground. Think of the earth as a giant heat sink. When you lie down on bare dirt, your body heat moves directly into the soil through a process called conduction. Because the earth is so massive, it will keep sucking away your warmth until you match its temperature. In the woods, that is a fight you are going to lose every single time.
Staying warm is all about separation. You need a thick layer of natural insulation like dry leaves or pine needles to act as a barrier. This wilderness mattress traps air and stops the ground from touching you. Without it, even the best roof will not save you from the cold. Aim for at least four to six inches of debris. If you can feel the hard earth beneath you, you do not have enough padding yet.
Key insights:
- Conduction transfers heat from your body to the ground much faster than air does.
- A thick layer of dry, loose debris is essential to break the thermal bridge.
- The goal is to create a pocket of dead air that prevents direct contact with the cold soil.
Piling Up the Padding
Ever wonder why you wake up shivering even with a solid roof over your head? It is because the cold ground sucks the heat right out of your body through conduction. To stop this, think of your bedding as both a mattress and a heater. You want to start by gathering a massive amount of the best natural materials nearby. Pine needles, dry leaves, and ferns are your best friends here because they are easy to find and trap air effectively.
Don't just toss a thin layer down and call it a day. You need a pile that looks way too big at first - at least a foot high. Here is the trick: you have to compress it. Once you lay down your fluff, crawl in and pack it down with your body weight. If it feels thin or you can feel the hard ground beneath you, add more. You are looking for a dense, springy cushion that keeps your skin far away from the frozen earth.
This padding does more than just make the night comfortable. By squishing those leaves and needles together, you create thousands of tiny pockets of dead air that hold your body heat close to you. It is basically nature’s version of a foam mattress, but one that actually keeps you safe when the temperature drops. If you do it right, you will feel the difference the second you lay down.
Natural Insulation Tips for a Toasty Night
When you are out in the woods, your biggest enemy is not a bear or a wolf - it is the ground and the wind quietly stealing your body heat. To stay warm, you have to think like a bird building a nest. It is all about trapping air. Think of air as your best friend when it is stuck in small pockets between leaves and twigs. Because it cannot move, it cannot carry your heat away. You need two distinct layers: a structural frame to hold everything up and a thick insulation layer to keep the warmth in. If you just throw a few branches together, you are basically sleeping in a drafty hallway. You want a cozy, thick pocket instead.
Now, here is where most people mess up. They gather a few armfuls of leaves, scatter them over their shelter, and think they are done. But a thin layer of leaves is just a screen, not a wall. If you want to actually stay warm when the temperature drops, you need to follow the three-foot rule. That means your walls should be about three feet thick with loose, dry debris. It sounds like a lot of work because it is. But when you are shivering at 2 AM, you will wish you had spent that extra hour piling on more forest floor fluff. Think of it as building a giant, leafy sleeping bag around your entire body.
Staying warm is one thing, but staying dry is what keeps you alive. You have to shingle your debris just like a pro roofer would. Start at the bottom and work your way up, overlapping each layer so the water runs off the outside instead of soaking through to your sleeping area. Use big pieces of bark or heavy evergreen branches on top. These act like weights to keep your insulation from blowing away in a sudden gust of wind. It is a simple trick, but it makes the difference between a miserable, soggy night and a dry, restful one. Also, remember that the forest floor is usually damp, so do not forget to pile just as much debris under you as you do over you.
Key insights:
- Trapped air is the secret to warmth; without it, your body heat just vanishes.
- Aim for at least three feet of debris to create a functional thermal barrier.
- Always shingle your roof material from the bottom up to shed rain effectively.
- Use heavy branches or bark to anchor your insulation against the wind.
How Much Debris is Enough? (Hint: More Than You Think)
Most people stack a few inches of leaves over their shelter frame and call it a day. But here is the cold truth: if you can see even a glimmer of light through your walls, you are going to freeze. Think of a thin layer of debris as a screen door rather than a solid wall. It might stop a light breeze, but it won't trap the body heat that keeps you alive when the sun goes down.
To stay truly warm, you need to follow the three-foot rule. This means your debris walls should be about an arm’s length thick all the way around. It sounds like a lot of work because it is. But you are creating a thick, fluffy barrier that holds onto the warmth your body generates. If you think you have enough leaves, keep piling them on for another hour.
Why go to all that trouble? Because as debris settles or gets wet, it loses its fluffiness and insulation value. Starting with a massive, three-foot-thick mound ensures that even after the leaves pack down, you still have a solid layer of protection. It is the difference between shivering all night and actually getting some sleep.
Key insights:
- If light gets through the walls, your body heat is escaping just as fast.
- Aim for walls at least three feet thick to account for natural settling and compression.
- More debris equals more trapped air, which is your primary defense against the cold.
Keeping the Rain Out
Think about how water behaves. If you just throw leaves on a pile, you will get soaked. To stay dry in a debris hut, you have to think like a roofer. This means shingling your materials. Start at the very bottom of your shelter and work your way up. Each layer needs to overlap the one below it so the rain runs off the surface instead of leaking through. It takes extra time, but skipping this is a recipe for a cold night.
Once your shingling is done, make sure it stays put. A light breeze can strip away hours of work if your insulation is loose. Use heavy branches and strips of bark to weigh everything down. Think of it as a natural net that locks your roof in place. This also helps compress the debris, which makes it better at shedding water.
If you can find large slabs of bark, use those as your final layer. They act like natural shingles and provide the best protection. You want your hut to look like scales on a fish. When the sky opens up, you will be glad you took the time to secure the roof.
Key insights:
- Always start shingling from the ground up to ensure water flows over the layers.
- Use heavy branches as a top layer to prevent wind from ruining your insulation.
- Bark slabs are the gold standard for natural waterproofing in the woods.
Bushcraft Shelter Design: Thinking Like a Forest Architect
When you are out in the woods, your shelter is more than just a pile of branches to crawl under. Think of yourself as an architect, not just a laborer. The big challenge is finding that sweet spot between building something fast enough to survive the night and making it comfortable enough to actually get some sleep. If you rush the process, you will likely be shivering by 2 AM. But if you over-engineer the structure, you will be exhausted before the roof is even finished. This balance is what separates a rough night from a restful one.
A great trick to improve your design is adding a small porch or a heat reflector right in front of the opening. This is not just for looks. A simple wall of logs or stones placed behind your fire bounces heat back into your sleeping area instead of letting it vanish into the trees. It is the difference between a cold cave and a cozy room. You can also extend your roof slightly forward to create a dry spot for your wood pile. Why does this matter? Because a dry fire is your best friend when the temperature drops.
To make the space feel like a home rather than a survival cell, clear out every single twig and rock from the floor before you lay down your bedding. It sounds like a small task, but a flat, clean floor makes a massive difference in how you feel mentally. You want to look at your build and think that you could actually stay there for a week. It changes your mindset from just trying to survive to actually thriving in the environment.
Comfort often comes down to the small things you might miss during the initial build. For instance, the wind has a habit of changing direction at midnight. If your entrance is wide open, you are basically inviting a draft to steal your body heat. You can use a heavy pack, a wall of pine boughs, or even a simple tripod frame covered in debris to block that opening. It keeps the warmth inside where it belongs and helps you sleep through the night without waking up cold.
Also, do not forget to plan for your gear. There is nothing worse than waking up in a dry shelter only to realize your boots and bag are soaked because they were sitting in a puddle just outside the door. Dig a small storage area or build a raised platform of sticks inside the shelter. Keeping your stuff off the ground keeps it dry and gives you more room to stretch your legs. These simple moves turn a basic bushcraft shelter into a functional wilderness home that actually works for you.
Key insights:
- Build a reflector wall to bounce fire heat directly into your sleeping space.
- Clear the ground of all debris before laying bedding to improve comfort and morale.
- Block the entrance with a pack or brush to stop shifting winds from stealing heat.
- Create a raised gear storage area to keep your boots and bag dry and organized.
Small Tweaks for Big Comfort
You have spent hours stacking branches and leaves, but if you leave the front door wide open, you are basically sleeping in a wind tunnel. A survival shelter is only as good as its seal. Think about how a cat curls up in a tight box to keep their body heat in; you want that same cozy vibe. Try blocking the entrance with a heavy pack or a wall of extra pine boughs. It stops the chilly drafts from stealing your warmth while you sleep.
Also, do not forget your gear needs a home too. If you toss your wet boots or damp bag right next to your bedding, that moisture is going to ruin your night. Create a small gear storage area near the door so your stuff stays dry and out of the way. Keeping your gear organized makes the difference between a miserable night and a solid rest. These tiny adjustments turn a basic pile of sticks into a place where you can actually relax and recharge.
Common Questions About Survival Shelters
You’re out there in the woods, the sun is dipping, and the reality of sleeping on the cold dirt starts to sink in. It’s totally normal to feel a bit of a knot in your stomach. Most of us worry about the wrong things, like big animals or getting lost, when the real challenge is actually staying dry and cozy. Think of your survival shelter as a literal cocoon. If you build it right, you aren't just lying on the ground. You are creating a tiny microclimate that keeps your body heat right where it belongs. It’s basically like building a giant, leafy bed for a very pampered cat, except you are the one who needs to stay warm.
One of the biggest questions is always about the ground. Why does it feel like the earth is sucking the life out of you? That’s conduction at work. Without proper wilderness bedding, even the best emergency debris hut won't save you from a shivering night. You need at least six to eight inches of compressed leaves, dry moss, or pine needles between you and the soil. Think of it as a natural mattress that traps warm air. If you skip this step, you’re basically sleeping on a giant ice pack that drains your energy until morning. The thicker the bedding, the better you will feel. Also, remember that the ground is much harder than your sofa, so more padding is always a good idea.
What about the creepy crawlies? People often ask if a natural shelter is just an open invitation for bugs. While you might see a few spiders or beetles, a well-constructed bushcraft shelter design actually keeps the wind and dampness out. That is what really matters for your safety. Focus on your natural insulation tips because layers of debris are your best friend. It’s not about being fancy. It’s about making sure that when the temperature drops, you have a solid wall of forest material protecting your peace of mind. If the roof is steep enough, the rain just slides right off instead of soaking through your gear. It is all about staying dry and keeping your whiskers out of the wind.
Key insights:
- The ground is your biggest heat thief, so never skimp on your bedding layer.
- A steep roof angle is the secret to staying dry during a surprise downpour.
- Thick debris walls provide a barrier against wind and help maintain your body heat.
- Building a shelter is like choosing the right cardboard box; size and insulation are everything.
Frequently Asked Questions
Conclusion
Building a solid survival shelter is basically like making a giant, cozy outdoor cat tree, but one that actually keeps you alive. It is not just about stacking sticks. It is about using natural insulation tips to stop the cold ground from stealing your warmth. When you combine a sturdy ridge pole with thick wilderness bedding, you are turning the forest floor into a reliable home.
The best part is the peace of mind that comes with these survival skills. Once you know how to build a survival shelter that works, the woods stop feeling like a cold, empty place. You realize you have everything you need right under your feet as long as you know which leaves to pile up and how to trap the air around you.
If you are ready to test your bushcraft shelter design, consider trying a practice run in your own backyard first. It is a lot more fun to figure out your emergency debris hut when you are not actually shivering. Get out there, get your hands dirty, and see how cozy you can make it. The woods are just waiting for you to make yourself at home.
Send it to someone who should read it next.
About the author

Rowan Hale
Bushcraft Instructor & Backcountry Skills Writer
Teaches fieldcraft, shelter systems, fire craft, and practical survival routines for readers who want usable skills, not theory.
View all articles